Alert Configuration
By default when you go through the Cyences App Configuration, the relevant alerts will be enabled automatically. But if user wish to make further modification they can do as described below. User can also manually enable/disable the alert if required.
Email Notification Configuration
Refer to Cyences Email Settings for Alerts section of the doc for more details.
Alert Filter Macro Configuration
Certain macros are being used to whitelist (filter) a specific set of results. This is useful for when an alert/report provides a result which is previously known in your environment. The benefit of this macro is that it filters the result set without having to make a copy of the alert/report/search, which will prevent any potential problems from arising when upgrading the Cyences App.
How to Update Filter Value (Do not update the macro directly)
- Open the Cyences App for Splunk.
- Navigate to Settings > Searches, reports, and alerts and select All for the Owner filter.
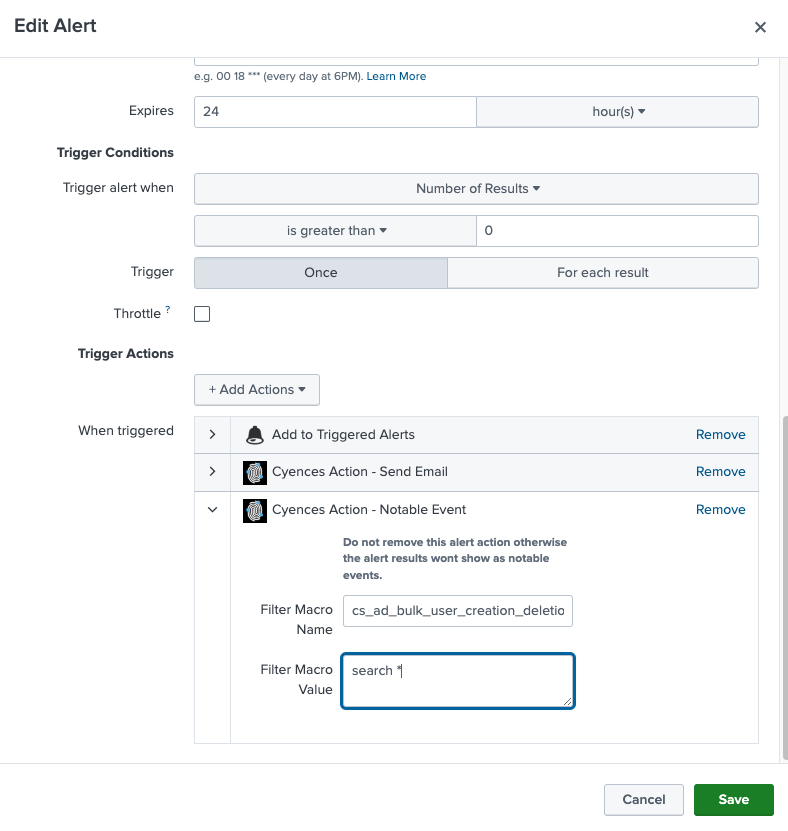
- Find the alert for which you would like to update filter for and Click Edit > Edit Alert.
- Update the Filter Macro Value field under When triggered > Cyences Action - Notable Event. Note: The default value for every macro is:
search *(this would return all results).
Filter example:
- In order to filter the events related to a service account, users can add
search NOT user="service-user"to the filter macro.

Note: Macro updates may not happen in real-time as we are performing updates every five minutes.
How to disable the alert state changes performed from the cyences setup page
- Open the Cyences App for Splunk.
- Navigate to Settings > Searches, reports, and alerts and select All for the Owner filter.
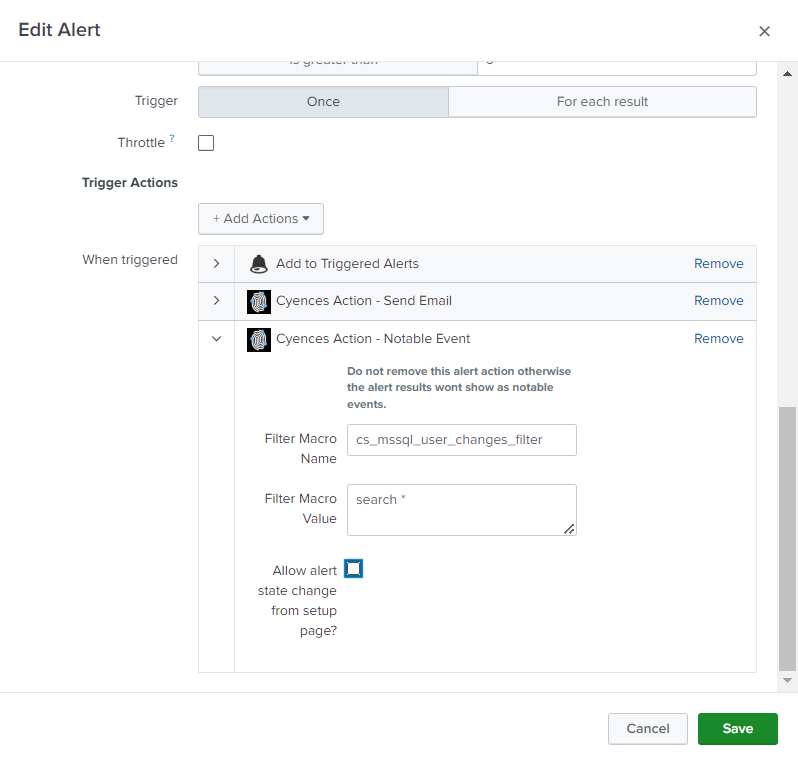
- Find the alert for which you would like to avoid state changes from setup page and Click Edit > Edit Alert.
- Deselect the Allow alert state change from setup page? checkbox under When triggered > Cyences Action - Notable Event.
- Save the changes.

Filter Alert Results Based on the Time of the Event
Since version 1.4.0, time-based filtering has been made available to every alert in the Cyences App. Let’s go over a use case to understand what that is, why you need it, and how to apply it.
Example - A user has a system (ex. 192.168.2.2) in their environment which conducts a penetration test every night between 1-2 AM via brute force password attempts to different systems. Due to these events, the user receives a ton of false positive alerts, which could easily by avoided.
The first course of action would be to filter the events that are coming in from that IP address.
Filter examples:
-
For the Authentication - Bruteforce Attempt for a User alert:
search NOT sources="192.168.2.2" -
For the Authentication - Bruteforce Attempt from a Source alert:
search NOT src="192.168.2.2"
The downside to this is that the time range of the filter itself is very wide, because the system is only making an attempt at midnight, but the user is filtering the system as a whole (which is critical for security). What if that machine was compromised? The more optimal solution would be to filter for that specific system, but only during a certain period of time.
Filter example:
-
For the Authentication - Bruteforce Attempt for a User alert:
`cs_generate_time_fields_for_filter` | search NOT (((firstTime_hour>=1) OR (firstTime_hour<2)) ((lastTime_hour>=1) OR (lastTime_hour<2)) sources="192.168.2.2") | `cs_remove_time_fields_for_filter` -
For the Authentication - Bruteforce Attempt from a Source alert:
`cs_generate_time_fields_for_filter` | search NOT (((firstTime_hour>=1) OR (firstTime_hour<2)) ((lastTime_hour>=1) OR (lastTime_hour<2)) src="192.168.2.2") | `cs_remove_time_fields_for_filter`
Both the firstTime_hour and lastTime_hour fields are generated by the cs_generate_time_fields_for_filter macro. There are other fields that the user could use, such as:
- firstTime_ptime (epoch time for firstTime)
- firstTime_date, firstTime_hour, firstTime_minute
- firstTime_wday (which day of the week)
- similar fields for lastTime
The above two alerts are generating firstTime and lastTime fields, which indicates the first and last event time during the course of the selected time range. In some cases, the alert time field could be event_time instead of _time. If necessary, Splunk users can substitute one of these fields for one of the following: event_ptime, event_date, etc.
Note: Basic knowledge of Splunk’s Search Processing Language (SPL) is required.